Most fitness goals fail within the first week. Not because people lack motivation — but because they pick the wrong starting point. The 30-day push-up challenge for beginners at home fixes that completely. It gives you a clear daily target, a progressive structure, and a single exercise that delivers serious upper-body results without any equipment.
Thirty days. One exercise. Zero gym required.
If you’ve never done a consistent push-up routine before — or if you’ve tried and quit — this guide will change that. By the end of this challenge, you won’t just be doing more push-ups. You’ll have built a genuine fitness habit, stronger arms and chest, improved core stability, and a measurable win you can build on.
Let’s get into it.
Why Push-Ups Are the Perfect Beginner Exercise
Before diving into the challenge schedule, it’s worth understanding why push-ups earn their reputation as one of the best bodyweight exercises on the planet.
A standard push-up simultaneously trains your chest (pectorals), shoulders (anterior deltoids), triceps, core, and even your serratus anterior — the muscle along your ribcage that most gym machines completely miss. That’s five muscle groups in a single movement with zero equipment.
Beyond muscle building, push-ups also:
- Improve joint stability in the wrists, elbows, and shoulders
- Strengthen the core as a stabilizing unit
- Support cardiovascular health when performed at higher rep ranges
- Build foundational strength needed for more advanced calisthenics
- Require no space, no cost, and no scheduling
The reason most beginners fail at push-ups isn’t a lack of strength — it’s a lack of structure. A progressive 30-day plan solves that by starting at an achievable level and building intelligently over time.
Perfect Push-Up Form for Beginners
How to Do a Standard Push-Up Correctly
Before you start the challenge, nail your form. Poor push-up technique leads to wrist pain, shoulder strain, and zero results. Here’s the proper setup:
- Place your hands slightly wider than shoulder-width apart on the floor
- Extend your legs behind you — toes on the floor, body in a straight line
- Engage your core and squeeze your glutes to keep your hips from sagging
- Lower your chest toward the floor by bending your elbows at roughly 45 degrees from your body
- Stop when your chest is about an inch from the floor
- Press back up to the starting position — fully extend your arms without locking your elbows
- That’s one rep
The most common mistakes beginners make:
- Flaring elbows out to 90 degrees (puts stress on the shoulder joint)
- Letting hips sag toward the floor (removes core engagement)
- Only going halfway down (reduces muscle activation significantly)
- Looking up too aggressively (strains the neck)
- Rushing through reps without control
Fix these from day one and your results will be dramatically better. For a deeper look at push-up form tips and injury prevention strategies, check out the beginner push-up safety guide.
Beginner Modifications (Start Here If Needed)
If standard push-ups are too difficult on day one — that’s completely normal and nothing to be embarrassed about. Use these progressions to build up:
Incline Push-Up: Place your hands on a raised surface — a wall, countertop, or couch. The higher the surface, the easier the movement. This is the best starting point for true beginners.
Knee Push-Up: Perform the push-up from your knees instead of toes. This reduces the load significantly while still training the same muscle groups.
The challenge schedule below includes a column for modification options. As you get stronger through the 30 days, you’ll naturally transition from modified to full push-ups.
Incline vs Knee Push-Ups: Which Is Better for Beginners?
This is one of the most common questions beginners ask. Here’s a direct comparison:
| Factor | Incline Push-Up | Knee Push-Up |
| Difficulty | Adjustable (lower = harder) | Fixed (moderate reduction) |
| Core engagement | Higher | Lower |
| Wrist strain | Lower | Moderate |
| Muscle activation | High (similar to full push-up) | Moderate |
| Progression path | Better — gradually lower surface | Limited |
| Best for | Most beginners | Those with wrist issues |
The verdict: incline push-ups are generally the better modification because you can progressively lower the surface height — making the exercise harder over time without changing the movement pattern. This is the principle of bodyweight exercise progression applied perfectly.
The Complete 30-Day Push-Up Challenge for Beginners at Home
This schedule follows a simple wave-loading structure — reps increase across the week, then slightly drop on rest days or recovery days, before climbing higher in the next week. This prevents overtraining while driving consistent adaptation.
How to use this schedule:
- Do your daily sets spread throughout the day if needed (morning, afternoon, evening)
- Rest at least 60 seconds between sets
- Use the modification version if you can’t complete the full reps with good form
- Mark each day complete — accountability matters
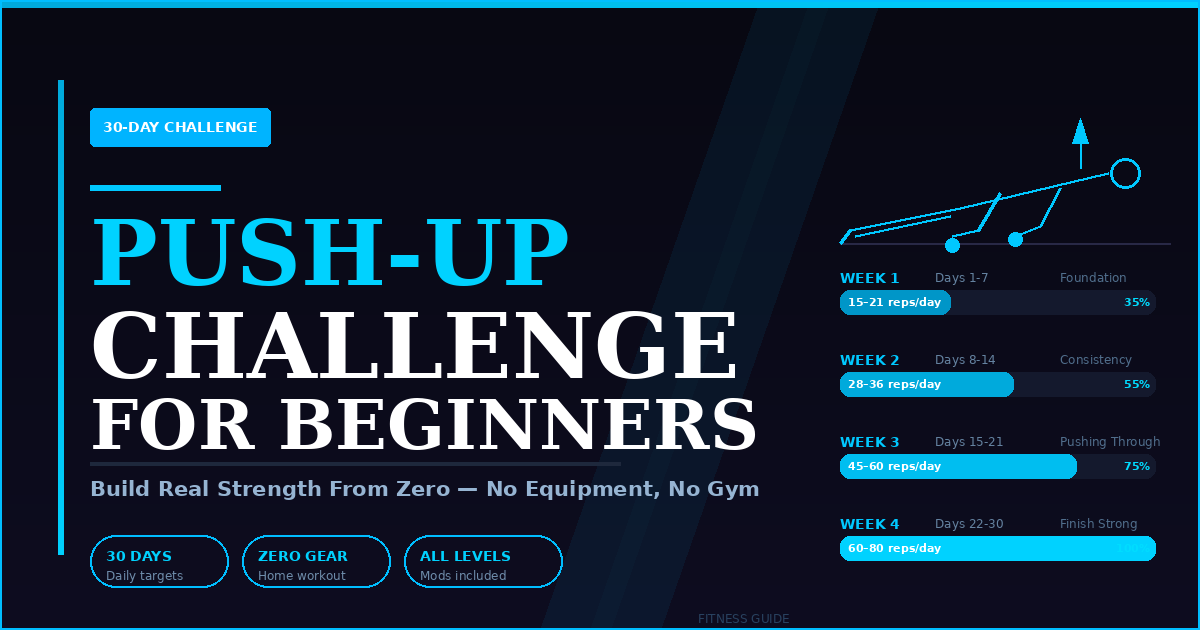
Week 1: Building the Foundation (Days 1–7)
| Day | Sets | Reps Per Set | Total Reps | Notes |
| Day 1 | 3 | 5 | 15 | Focus entirely on form |
| Day 2 | 3 | 5 | 15 | Slow down the lowering phase |
| Day 3 | REST | — | — | Light stretching only |
| Day 4 | 3 | 6 | 18 | Add one rep per set |
| Day 5 | 3 | 7 | 21 | Push through the last rep |
| Day 6 | 4 | 5 | 20 | Extra set, same reps |
| Day 7 | REST | — | — | Recovery day |
Week 2: Building Consistency (Days 8–14)
| Day | Sets | Reps Per Set | Total Reps | Notes |
| Day 8 | 4 | 7 | 28 | You’ll feel stronger this week |
| Day 9 | 4 | 8 | 32 | Control the descent |
| Day 10 | REST | — | — | Recovery |
| Day 11 | 4 | 8 | 32 | Eliminate modifications if possible |
| Day 12 | 4 | 9 | 36 | Push your limit on the last set |
| Day 13 | 5 | 7 | 35 | Five sets for the first time |
| Day 14 | REST | — | — | Recovery |
Week 3: Pushing Through (Days 15–21)
| Day | Sets | Reps Per Set | Total Reps | Notes |
| Day 15 | 5 | 9 | 45 | Halfway point — celebrate this |
| Day 16 | 5 | 10 | 50 | First 50-rep day |
| Day 17 | REST | — | — | Recovery |
| Day 18 | 5 | 10 | 50 | Match Day 16 — consistency wins |
| Day 19 | 5 | 11 | 55 | Increase by one rep per set |
| Day 20 | 5 | 12 | 60 | Strong push |
| Day 21 | REST | — | — | Recovery |
Week 4: Finish Strong (Days 22–30)
| Day | Sets | Reps Per Set | Total Reps | Notes |
| Day 22 | 5 | 12 | 60 | Maintain Week 3 peak |
| Day 23 | 5 | 13 | 65 | Push beyond your comfort zone |
| Day 24 | REST | — | — | Recovery |
| Day 25 | 5 | 14 | 70 | You’re close — don’t stop |
| Day 26 | 5 | 15 | 75 | Three-quarter century of push-ups |
| Day 27 | 5 | 15 | 75 | Match yesterday — stay consistent |
| Day 28 | REST | — | — | Final rest day |
| Day 29 | 5 | 16 | 80 | Second to last day — give it everything |
| Day 30 | Max effort | As many as possible | Personal best | Test your true max — celebrate every rep |
By Day 30, most beginners completing this challenge will have doubled or tripled their starting push-up capacity. That’s measurable, real strength built in 30 days at home.
How to Track Your Push-Up Challenge Progress
Tracking transforms a workout into a challenge. Without it, you’re just doing random push-ups. With it, every session becomes a data point in your improvement story.
Simple tracking methods that work:
- Notebook or journal — old school but extremely effective. Write date, sets, reps, and how you felt
- Smartphone notes app — quick, always with you, easy to review
- Push-up tracking apps — apps like “100 Pushups” or “Pushup Trainer” automate the counting and progression for you. See the push-up app for tracking daily reps guide for top recommendations
- Weekly photo or video — record yourself doing max reps at the start of each week. The visual progress is incredibly motivating
Whatever method you choose, the act of tracking itself increases completion rates significantly. It creates accountability and makes your progress visible — which is exactly what keeps beginners going past day 10.
Recovery and Nutrition During the Challenge
Rest Days Are Not Optional
This is a 30-day challenge, not a 30-days-without-rest challenge. The rest days built into the schedule are where your muscles actually repair and grow stronger. Skipping them to “do more” is counterproductive and increases injury risk.
On rest days:
- Do light walking or gentle stretching
- Focus on sleep — muscle repair happens primarily during deep sleep
- Avoid training the same muscle groups with other exercises
What to Eat to Support Push-Up Gains
You don’t need a complicated diet — but nutrition does matter. A few straightforward principles:
- Protein is non-negotiable. Aim for 0.7–1g of protein per pound of bodyweight. Eggs, chicken, Greek yogurt, lentils, and cottage cheese are all excellent sources for arm and chest muscle building.
- Stay hydrated. Even mild dehydration reduces strength output by up to 10%.
- Don’t undereat. Building muscle requires a slight caloric surplus or at least maintenance calories. Extreme restriction while doing a push-up challenge leads to fatigue, not results.
For a complete breakdown of what to eat to support your training, explore the best foods to maximize push-up gains guide.
What Happens After Day 30?
Completing a 30-day push-up challenge for beginners at home is a genuine achievement. But day 31 matters just as much as day 30.
Here’s where to go next:
- Test your max rep set — this is your new baseline
- Try advanced push-up variations — wide grip, decline, archer, and eventually one-arm push-ups to continue progressing. The push-up variations for advanced home workouts guide has everything you need
- Add a pulling movement — push-ups train the pushing muscles well, but balance your training with inverted rows or a pull-up progression to build a complete upper body
- Start a new challenge — use the same progressive structure for a daily calisthenics routine that incorporates squats, dips, and rows for full-body development
The habit you’ve built in 30 days is the real prize. The push-ups are just the beginning.
FAQ: 30-Day Push-Up Challenge for Beginners
Q: How many push-ups should a beginner aim for on day one? Start with whatever you can do with perfect form — even if that’s just 3–5 reps per set. The challenge is designed to build from your actual starting point, not an arbitrary number. Completing 3 perfect push-ups beats struggling through 10 sloppy ones every time.
Q: Can 100 push-ups a day build chest and triceps? Yes — but jumping straight to 100 daily push-ups is not beginner-appropriate. Start with this 30-day progressive challenge first, build your foundation, then explore the step-by-step guide to 100 push-ups a day once your base strength is established.
Q: How do I avoid wrist pain during push-ups? Wrist pain usually means the wrists are bending too far backward. Try performing push-ups on your fists (knuckle push-ups) to keep the wrist neutral, or use push-up handles. Also, warm up your wrists with gentle rotations before each session.
Q: Will this challenge help with weight loss? Push-ups alone won’t drive significant weight loss, but they do build muscle — and muscle increases your resting metabolic rate over time. Combined with a balanced diet and some cardiovascular activity, this challenge absolutely supports a fat loss goal.
Q: Is it okay to do push-ups every day for 30 days? This plan includes built-in rest days for good reason. Training the same muscles every single day without recovery leads to overtraining, not faster results. Follow the schedule as written — including the rest days.
Q: What if I can’t complete all the reps on a given day? Do as many quality reps as you can, rest, and finish the remaining reps in additional sets. Never sacrifice form to hit a number. Progress matters more than perfection on any single day.
Q: Can teenagers and older adults do this challenge? Absolutely. Push-ups are one of the safest bodyweight exercises across all age groups when performed with proper form. Older adults should start with incline push-ups and progress more gradually. Teenagers benefit enormously from learning proper push-up form early — it builds lifelong strength habits.
Conclusion
The 30-day push-up challenge for beginners at home is more than a fitness routine — it’s a proof of concept. Proof that you can build real strength, develop a consistent habit, and transform your upper body without a gym, without equipment, and without wasting hours each week.
Start where you are. Use the modifications if you need them. Follow the schedule. Track your progress. Rest when the plan says to rest.
Thirty days from now, you’ll look back at Day 1 and barely recognize how far you’ve come.